
After watching “Ron’s Gone Wrong” with my kids, they idea came to try and build something like this. Obviously, its a movie, and we’re not AI or robotics experts, but the process so far has been full of learning & very interesting.
This is a work in progress, so check back for updates.
Contents
We call him Ron
Here are some high level goals:
- Mirror Google Assistant / Alexa functions as much as realistically possible
- A unique personally with a friendly voice
- Be able to act completely independently, like a pet or child would, including moving around its environment & interacting with people.
- Fun and entertaining features
- Intuitive & easy to interact with
Hey Ron… Tell me a joke
This is the first feature I built into Ron. Enjoy! See below for more about how all this works.
Core Hardware
Starting with the hardware, this represents the core “brain” of the Robot where all the software is written, and all the hardware is controlled from
- Raspberry Pi 4b 8GB
- Arduino Nano
Support Hardware
Next we have some support hardware. These are the extra bits an pieces that we’ll be using to make him do stuff.
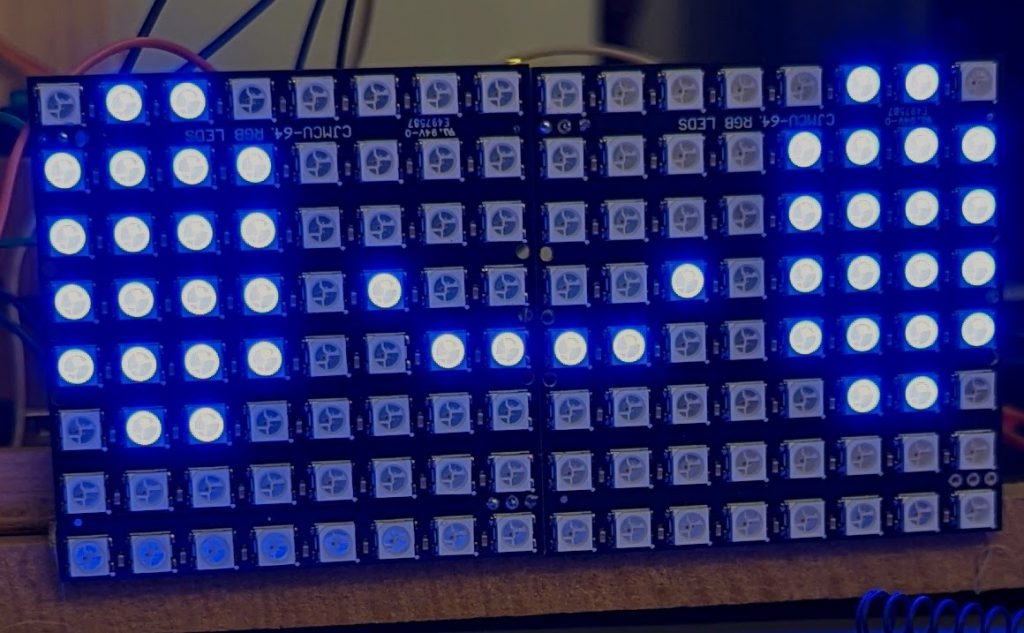
- Face – LED Matrix – Matrix 8×8 64 DIY GyverLamp WS2812B LED Digital Flexible Individually Addressable Panel Pixel Light Display Board DC5V
- Arms & head movement – Servos – SG90 9G Micro Servo Motor For Robot 6CH RC Helicopter Airplane Controls for Arduino
- Distance sensor – 3.3v Ultrasonic sensors RCWL-1601 Ultrasonic Ranging Sensor Module Compatible HC-SR04
- Wheel motor driver board – L298N Driver Board Module L298N Stepper Motor Smart Car Robot Breadboard Peltier High Power L298 DC Motor Driver for Arduino
- Vision & microphone – Starting with generic Web Cam & PS3 Eye camera. The microphone in the latter is great for the price, you can find them on eBay.
- Amplifier – Mini PAM8403 Digital Audio Amplifier Board 4 Channels 3W*4 DC 5V Stereo Sound AMP XH-A156 with Cable For Speaker
Other hardware TBC
There are still more hardware items to purchase, so parts I have ideas on, others I just know they’re out there waiting to be discovered
Microphone – Looking at a more robust microphone for use once we get beyond the prototype phase. Something like the SeeedStudio ReSpeaker Mic Array.
Wheels & chassis 2WD Mobile Platform for Arduino is currently what I am looking at for the drive system.
Battery pack(s) will absolutely be required!
Many little pieces here and there to get it all together
Features, capabilities and technical stuff
A note about my code.
I have no problems sharing any of my code with anyone, so if you would like to see it, let me know. I’m refraining from making it generally public (at this time at least) because:
- I’m not a programmer, but I know what good code looks like – this isn’t it
- Hardcoded references to paths, credentials and API keys
- Flat out ignoring best practices because it works without using them
- High chance I’m doing some things completely stupid
- Lots of “take an example, chop bits away & use what is left”, the stick it together with duct tape
But if you would like to see some of it, let me know.
Raspberry Pi
The Raspberry Pi is a 4b model with 8GB of RAM. I chose this model as I hope to do lots of machine learning and image processing. It is running the 64 bit operating system.
I’m making use of the many python libraries to make all the magic happen.
Arduino Nano
The Nano is being used exclusively for controlling the LED matrix for the face, and any servos for movement, such as turning the hard or moving the arms.
Wake Word
I spent lots of time looking for the best way to implement the wake word. Many services have been long since depreciated and/or not updated to support the latest OS or Python versions. I landed on Porcupine Wake Word by picovoice.ai The service is free (with limits) and their Git-Hub has some great examples. https://github.com/Picovoice/porcupine
Speech-to-Text
For speech to text I am using Googles Speech to Text. While its not free, the price is low & in my experience the best performing. If you are looking for completely free, Picovoice has on device recognition, which honestly I have not tried since upgrading the to Pi 4 in terms of performance. I think with a good mic (i.e. not a webcam) and on this hardware, it would work really well.
The Google service has some great examples to get you started: https://cloud.google.com/speech-to-text/docs/samples
Text-To-Speech
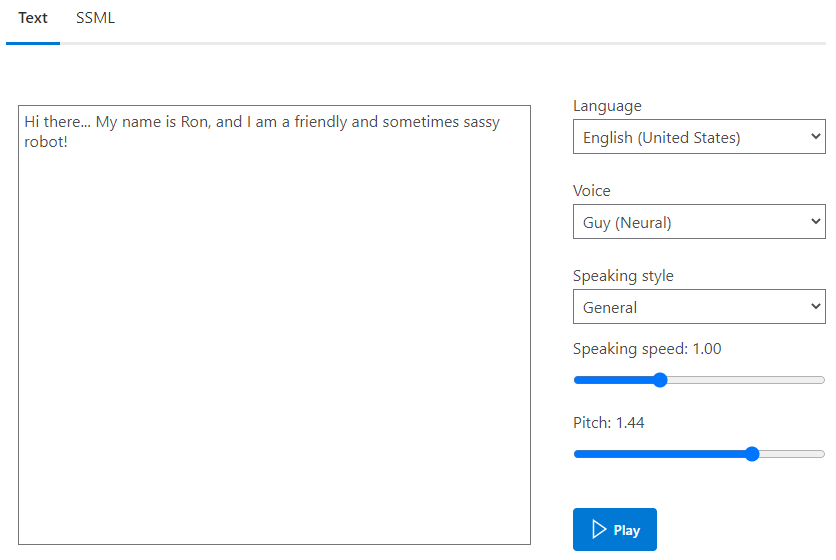
For text to speech, i.e. how it talks, I landed on a Microsoft Text to Speech solution . Originally I could not get the Pi/Python/OS version using, and ended up offloading this to my local PC. However as my Python knowledge improved, I was able to target the REST API directly
- A “speak” function is shared to all Python files
- Based on the text, it will generate a unique filename for what is to be said
- If that file exists already, it will simply play that file, saving on an API call.
- Otherwise the sound file is downloaded & converted to a WAV file
For bonus marks:
- Each word gets broken out individually, generated and saved. In the case of this service no longer being available, I will likely be able to make up any saying, although sounding choppy, using this voice.
Advanced Speech Functions
To enable more responsiveness, and a better experience, I developed “speech categories”. These are what I call groups of responses to the same situation. For example, the “hello” category may include these possible responses:
- Hi
- Hello
- Hi there
- G’Day
These responses are pre-generated during startup, and can be references by a “speak from category” function.
To also reduce API calls, “speak from parts” was created. This allows for a list of phrases to be passed in. This is helpful for things like the weather, where the parts may be:
["Today, the weather will be","10 degrees and cloudy","with a low of 5"]
This allows for cache to be used in for each part, presuming the entire sentence isn’t already cached.
Sound Demo
Here is sound bite:
The MS website for speech to text has a great tool for finding and customizing your voice. You will need to create a SSML (Speech Synthesis Markup Language) file. Here is the example for the above:
<speak version=""1.0"" xmlns=""https://www.w3.org/2001/10/synthesis"" xml:lang=""en-US"">
	<voice name=""en-US-GuyNeural"">
		<prosody pitch=""x-high"">Hi there... My name is Ron, and I am a friendly and sometimes sassy robot!</prosody>
	</voice>
</speak>
If you want to design your own voice, head over to https://azure.microsoft.com/en-us/services/cognitive-services/text-to-speech/#features
Here is what the UI would look like for his voice, approximately.
Program concurrency, multithreading and multiprocessing
When I started building this, it was a few methods/functions being called one after the other when things happened. For example, the main code would wait at the wake word, then when activated, the next call was to Speech-to-Text.
My lack of knowledge using PyAudio & audio devices in general meant a long time between when the wake word was said, and when recording of the command could begin. So I then split them into separate threads, using “true/false” flags in files written to disk so they can signal each other.
I then discovered in Python that it will not actually execute more than one thread at at time, which IMO defeats the purpose. To work around this, all core functions are now individual python scripts, started from the main script. They run independently from each other, using the “flag file” method to communicate. The article Multithreading VS Multiprocessing in Python reference explained threading & multiprocessing very well.
SD card latency was the next hurdle, These flag files worked great, however at times the performance was poor. Given the contents of these files did not need to persist across reboots, I used a RAM disk for these. This may have been the single biggest performance improvement. I followed this guide here: RASPBERRY PI 4 RAM DISK.
Facial & Object Recognition
A key part of this build was so it could recognize people around it, and respond accordingly. The package used for this was OpenCV, which is somewhat of a standard for image capture and analysis.
Now, OpenCV may actually be the hardest thing to get working. I lost weeks of time getting it going, even resorting to using others images to get it going. Many incompatibilities all over the place, including with the latest release if you are on 32bit. I found this tutorial worked great when I was on the 32bit version. If you are on 64bit, I believe the install is really simple if you look for it, like a “pip” one liner.
Face Recognition With Raspberry Pi and OpenCV
After getting it working, I removed references to any GUI component, and add the following:
- Write each name out to a file with date/time it was observed
- Periodically save the frame when a guess on a face was made, so it can be reviewed later & retrained
- Functions to take pictures on demand (integrated back into the core programming).
Object and Animal Recognition With Raspberry Pi and OpenCV
Next up was object detection. I have this working but not currently doing anything with it, mostly on account of bad lighting conditions in my basement finding cats, dogs and couches everywhere, despite the camera being trained on me.
Things he can do
The list of built in functions he can to is growing all the time. Below is a simple table I’ve created which helps briefly summarize them.
| Feature | Data source or functional information | Notes |
| Tell jokes | https://icanhazdadjoke.com/ | This is a simple Python request.get call. Once we retrieve the joke, the generated speech is written to file so it can be used again. I cake a 50/50 random split at a new joke or an old one. Following the telling of a joke, 1 out of 10 times, a randomly selected over the top laugh track will play. |
| Facts | http://www.djtech.net/humor/useless_facts.htm via https://uselessfacts.jsph.pl/random.html | There are lots of places you could get a list of facts, many are a paid service. This list is simple enough for our purposes |
| Weather | https://openweathermap.org/api | This provides a full json response for weather requests. In my opinion, it is overkill for this purpose. I have hard coded my home for now to avoid trying to lookup other locations. Speech from this is not cached, so when the speech service is offline, the weather will default to individual words mashed together badly. |
| Music detection | https://rapidapi.com/apidojo/api/shazam | This is a reverse engineered Shazam API which is free to use for a low number of calls. A user can invoke this on request & results saved for later use. When idle he will randomly call this function to see if anything is playing, and make a comment if this song is one he has heard before. |
| Special days | I have written a list of days for us that are important. Family birthdays, holidays, etc. You can ask him if today is a special day, or he may randomly tell you. | |
| Calculator | If a spoken command does not match anything he’s programmed to do, we check to see if there are 2 or more numbers. If so, we will parse the command and assume its a basic math problem. 1. Convert any written numbers to numbers 2. Convert any written operators to symbols, i.e. “plus” becomes “+” 3. Remove anything from the string that is not a number of symbol 4. Pass to the “eval()” command. | |
| Chat mode | Tutorial: https://towardsdatascience.com/a-simple-chatbot-in-python-with-deep-learning-3e8669997758 | I took this example & used it to provide one line responses to any command given that was not identified to be one we have a function for. Additionally, we’re overriding some of the “intents” with specific things we would like to do, mainly where need the AI model to derive what we want. |
| Natura Language AI | Natural Language AI | This is used to better understand anything captured in “chat mode”. While not currently used widely, the result JSON is cached & also summarized for later use, to help expand the chat mode responses |
| Question and Answer | This is the latest module I have written. I have pre-defined a list of things I want the robot to be able to remember about an individual, such as favorite color, hobbies, etc. Using the Natural Language API, the robot will ask questions & parse the response for the user to confirm. It is then stored in a repository for later use. | |
| Alarm/timer | Writes the intended alert date/time to a file, and the command processor checks for any time in the past, and if so, alerts that t has passed & clears the record. | |
| What day/time | Simple date functions to tell the user what the date and/or time is | |
| Insult generator | https://www.robietherobot.com/insult-generator.htm | Language alert. This is used to generate an insult when asked, or if he sees an individual he’s coded to insult. I found a list of “adult” words and filter responses for those if its called before 10pm |
| Compliment generator | https://www.generatormix.com/random-compliment-generator and http://www.madsci.org/cgi-bin/lynn/jardin/SCG | Some of these aren’t really compliments, but it works. I also created my own simple list for obvious occasions, like when the wife shows up. |
| Fun APIs | https://developer.vonage.com/blog/2021/03/15/the-ultimate-list-of-fun-apis-for-your-next-coding-project | I’ve taken a number of ideas from this list, and implemented either on demand or at random. All API responses are cached locally so they can be reused if/when an API limit is hit. |
| My Birthday | Tell him it your birthday and he’ll sing you a song. | |
| Take a picture | Pushbullet | When asked, he will take a picture and use the Pushbullet service to send it to my phone |
| Flip a coin | Random number 0 or 1 | 0 is tails, 1 is heads |
| Chicken Mode | Replaces any sound output with a chicken sound effect |
Some other features are:
- “Live view” of the web cam – this is actually a still image taken every couple of seconds
- “Speak” – using a simple web service, get him to say anything you want.
Personality
One thing I wanted to do was give the robot a personality. I’m not a behavioral scientist, but my ideas to emulate personality are:
- Tone of his voice
- A wide variety of witty & funny responses
- Randomization of many small features
- Responses specific to known individuals
- Ability to remember things
- Random acts when idle – including the idle interval itself. Playing music, moving around. Asking kids for ideas here is great.
Features in Detail
Features listed here are ones written after this article started, ones above where I have taken the time to detail them.
Coin Flip
The coin flip is really simple, but keeping up with a “personality”, I’ve added extra features:
- Random number to decide if its heads or tails (0=tails, 1=heads)
- Randomly choose if we should talk before we flip
- Randomized coin flip sound, including Mario coin sound
- A few prefixes to the result.
Here is a code snippet. Code in BOLD indicates a custom procedure to perform the action, They are pretty obvious as to their functions.
Ideally the options and possibilities would be configurable & not hard coded.
def cmd_flip_coin():
    coin_flip = random.randint(0,1)

    result = ""

    if coin_flip == 1:
        result="heads"
    else:
        result="tails"

    if random.randint(0,5) == 5:
        speak("Do you have a coin?...")
        speak("Nevermind, I found one... Hang on!")

    coin_sounds = []
    coin_sounds.append('/home/pi/Robot/Python/Prototype_v1/sounds/Coin1.mp3')
    coin_sounds.append('/home/pi/Robot/Python/Prototype_v1/sounds/Coin2.mp3')
    coin_sounds.append('/home/pi/Robot/Python/Prototype_v1/sounds/Coin3.mp3')
    coin_sounds.append('/home/pi/Robot/Python/Prototype_v1/sounds/Mario_Coin.mp3')

    sound_effect = random.choice(coin_sounds)

    playSoundMP3(sound_effect)

    speech_prefixes = []
    speech_prefixes.append("")
    speech_prefixes.append("It landed on ")
    speech_prefixes.append("Its ")

    speech_prefix = random.choice(speech_prefixes)

    speak(speech_prefix + result)
Servos
Using servos to move things is a pretty standard approach for robotics. Using the small, cheap off the shelf servos with easy to use Arduino libraries gets you going quickly. Here is a quick video of the “say hi” functionality.
https://youtube.com/shorts/dMeqeBoNYow
Distance Sensors
I decided to use 2 ultrasonic distance sensors for this project. My main concern was handling angled surfaces, and with two sets of readings, I would be able to determine if I am hitting an angle or not. I build a simple harness out of left over lumber for testing:
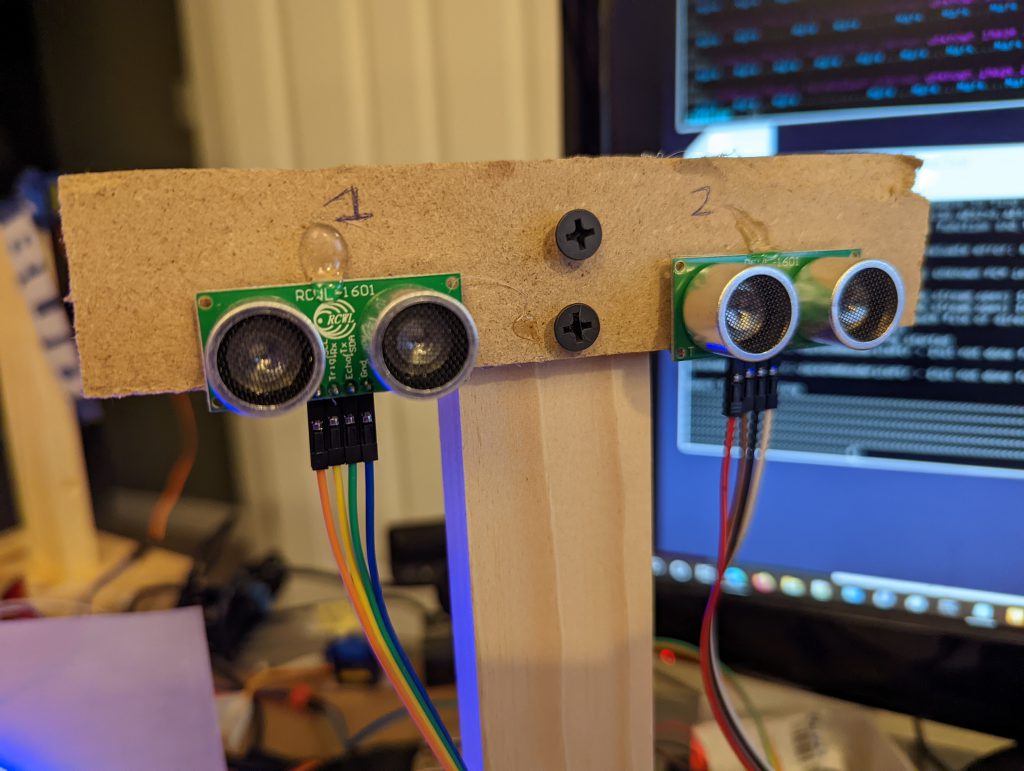
These are 3.3v ultrasonic sensors, that attach directly to the Raspberry Pi. To achieve more reliable results, a measurement is taken from each sensor 5 times, alternating. The list of measurements is then sorted & we take the “middle” value. This all happens in less than a second.
A 3rd sensor will be used to measure distance off the ground – specifically the front. The robot will be weighted at the rear, so the downward pointing 3rd sensor will be able to be over the edge of a step & command the robot to reverse or stop. Additionally, if its not moving & the value changes, the robot can make a comment about being picked up.
Chicken Mode
This sounded simpler on paper – when enabled, make chicken noises instead of real responses. In reality, a little harder. The solution was to implement this in the “playSound” function. The logic is as follows:
- Get the duration of the sound that would have been played.
- Set a random factor either side of this value to find a matching chicken sound.
- If there isn’t one in that window, get the next longest sound.
- Otherwise get the smallest sound.
- If there is more than one sound candidate, randomly pick one.
I used the chicken sounds recorded & posted in this GitHib mmalpartida/chicken-assistant-skill. Do check out that project, he built an animatronic chicken & an assistant AI. I then cut the sounds into smaller sub-files. You can download the resulting chicken sample files & sample code is below.
def getChickenSound(length):
    chicken_sounds = []
    chicken_files = list(filter(os.path.isfile, glob.glob("/home/pi/Robot/Python/Prototype_v1/sounds/chicken_response*")))
    for f in chicken_files:
        sound_file_name = f
        sound_length = getSoundLength(f)chicken_sounds.append((sound_file_name,sound_length))

    return_file_name = ""

    sound_candidates = []

    variance_factor = random.random()
    while variance_factor > 0.5:
        variance_factor = random.random()

    min_length =  desired_length - variance_factor
    max_length =  desired_length + variance_factor

    chosen_index = -1

    for idx,c in enumerate(chicken_sounds):
        if c[1] >= min_length and c[1] <=max_length:
            sound_candidates.append(c[0])

    if len(sound_candidates) <1:
        for idx,c in enumerate(chicken_sounds):
            if c[1] <= max_length:
                sound_candidates.append(c[0])

    if len(sound_candidates) <1:
        for idx,c in enumerate(chicken_sounds):
            if c[1] >= min_length:
                sound_candidates.append(c[0])

    if len(sound_candidates) < 1:
        c = random.choice(chicken_sounds)
        sound_candidates.append(c[0])

    return_file_name = random.choice(sound_candidates)

    return return_file_name
QR and Barcode Reader
I had this idea that Ron could read a barcode, and act accordingly. If it was a QR code, it could sent the URL (if present) to my phone, or read aloud the details. If it was a barcode, it would in turn hit some “yet-to-be-defined” API to get pricing information & product description.
The go-to choice for this in Python is OpenCV with pyzbar. The code is really straightforward, especially if you do not need to see the screen yourself. Here is the base code:
import cv2
from pyzbar import pyzbar

vs = VideoStream(src=0,framerate=10).start()

barcode_frame = vs.read()
barcodes = pyzbar.decode(barcode_frame)

for barcode in barcodes:
	barcodeData = barcode.data.decode("utf-8")
	barcodeType = barcode.type

	text = "{} ({})".format(barcodeData, barcodeType)

	process_barcode(barcodeData,barcodeType)
The method process_barcode is where my code lives. Here is a snippet:
if barcodeType == "QRCODE":
	if "http" in barcodeData:
		speak("It looks like a website address.")

	#Use PushBullet API to send to my phone
	sendNote("QR Code Detail",barcodeData)

	#use Newspaper to read the article
	title,summary = getPageSummary(barcodeData)

	speak("The website is called: " + title)
	speak("Here is a short summary... " + summary)
else:
	speak("The barcode reads: " + barcodeData)
Quick notes about these methods:
sendNote – uses this implementation of the Pushbullet API to send.
getPageSummary – uses Newspaper3k to quickly scan the website.
Fun with AI
Access to AI & machine learning has become very much common place in the last 12 months. I’ve been incorporating as much of that as I can into this project!
DeepAI – https://deepai.org/ have a range of APIs you can target easily & either free or low cost.
- Text to Image. Similar to “Dall-E” and other generators. Simple ask Ron to make a picture and this API call will create it.
- Text Generator. Ask Ron to make a story for you. With some keywords appended to user input, this API will generated a paragraph of text which Ron will parse & read out
Chromecast
We’re a “Google” house, with Chromecasts in every main room & speakers on all levels. I’ve used the pychromecast library to control this. The logic works as follows:
- Search for existing music that we have already stored on our PC. This content is over 12 years old thanks to streaming vs buying CDs and ripping them.
- If no media is found, then search YouTube using the YouTube v3 API & cast it to a Chromecast display
Twitter Integration
I’ve written the code for this however I am not sure it will make it into the build. Giving Ron an “ask twitter” ability may not necessarily yield content that is useful in this context, but time will tell.
Using the Twitter v2 search API, I use a custom search to try and get the content I need:
query_params = {'query': search_string + ' (-is:retweet -is:reply) -horrible -worst -sucks -bad -disappointing -evil' }
Filtering our retweets & replies, then omitting some words as a starting point. langdetect and textstat libraries to filter those results for meaningful content.
I currently have no plans to allow Ron to post content directly!
Games
I wrote a couple of simple games to play on Ron. The classic Hangman and simple number guessing game. For hangman, the game will use pre-drawn hangman images to display progress in the game. You can download the hangman images from here if you would like to use them.

Chuck Norris
A self aware robot wouldn’t be complete it if he didn’t know about Chuck Norris. I’ve used this Chuck Norris API to pull in “facts” both randomly and on demand. Warning, you might want to filter results through a profanity/kid friendly filter first.
ASCII Art
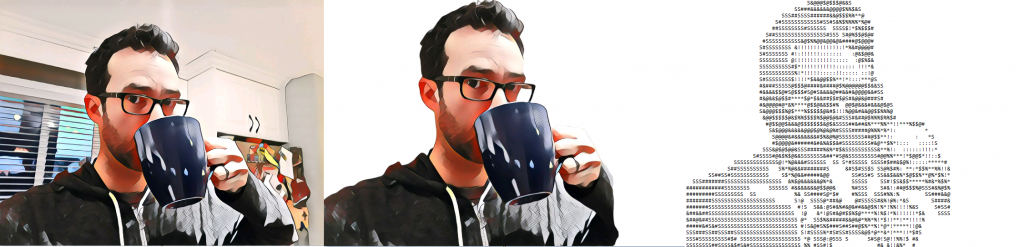
Old school ASCII art goes way back to the days of dial-up bulletin boards & perhaps even beyond. I’ve used a couple of services to recreate this feature:
- Removal.AI to remove the background of any image. This allows for a cleaner ASCII art to be produced.
- The below ASCII art code which I lifted from PyWhatKit and customized for my own use.
The image below highlights the process:
def image_to_ascii_art(img_path, output_file = "pywhatkit_asciiart.txt"):
    """Convert an Image to ASCII Art"""

    img = Image.open(img_path).convert("L")

    width, height = img.size
    aspect_ratio = height / width
    new_width = 100
    new_height = aspect_ratio * new_width * 0.55
    img = img.resize((new_width, int(new_height)))

    pixels = img.getdata()

    #chars = ["*", "S", "#", "&", "@", "$", "%", "*", "!", ":", "."]
    chars = [" ", "S", "#", "&", "@", "$", "%", "*", "!", ":", " "]
    new_pixels = [chars[pixel // 25] for pixel in pixels]
    new_pixels = "".join(new_pixels)

    new_pixels_count = len(new_pixels)
    ascii_image = [
        new_pixels[index : index + new_width]
        for index in range(0, new_pixels_count, new_width)
    ]
    ascii_image = "\n".join(ascii_image)

    with open(output_file, "w") as f:
        f.write(ascii_image)
    return ascii_image
Build
Constructing the physical body may be the hardest part. Code is easy to google, debug and re-write. But making something that is:
- Modular
- Repairable
- Solid
- Lightweight
- Functional
All at the same time is a few difficult task. If I was proficient in 3D printing, things would be somewhat easier. But I’ll be using every day materials. Plastic, wood & anything else I can find in between.
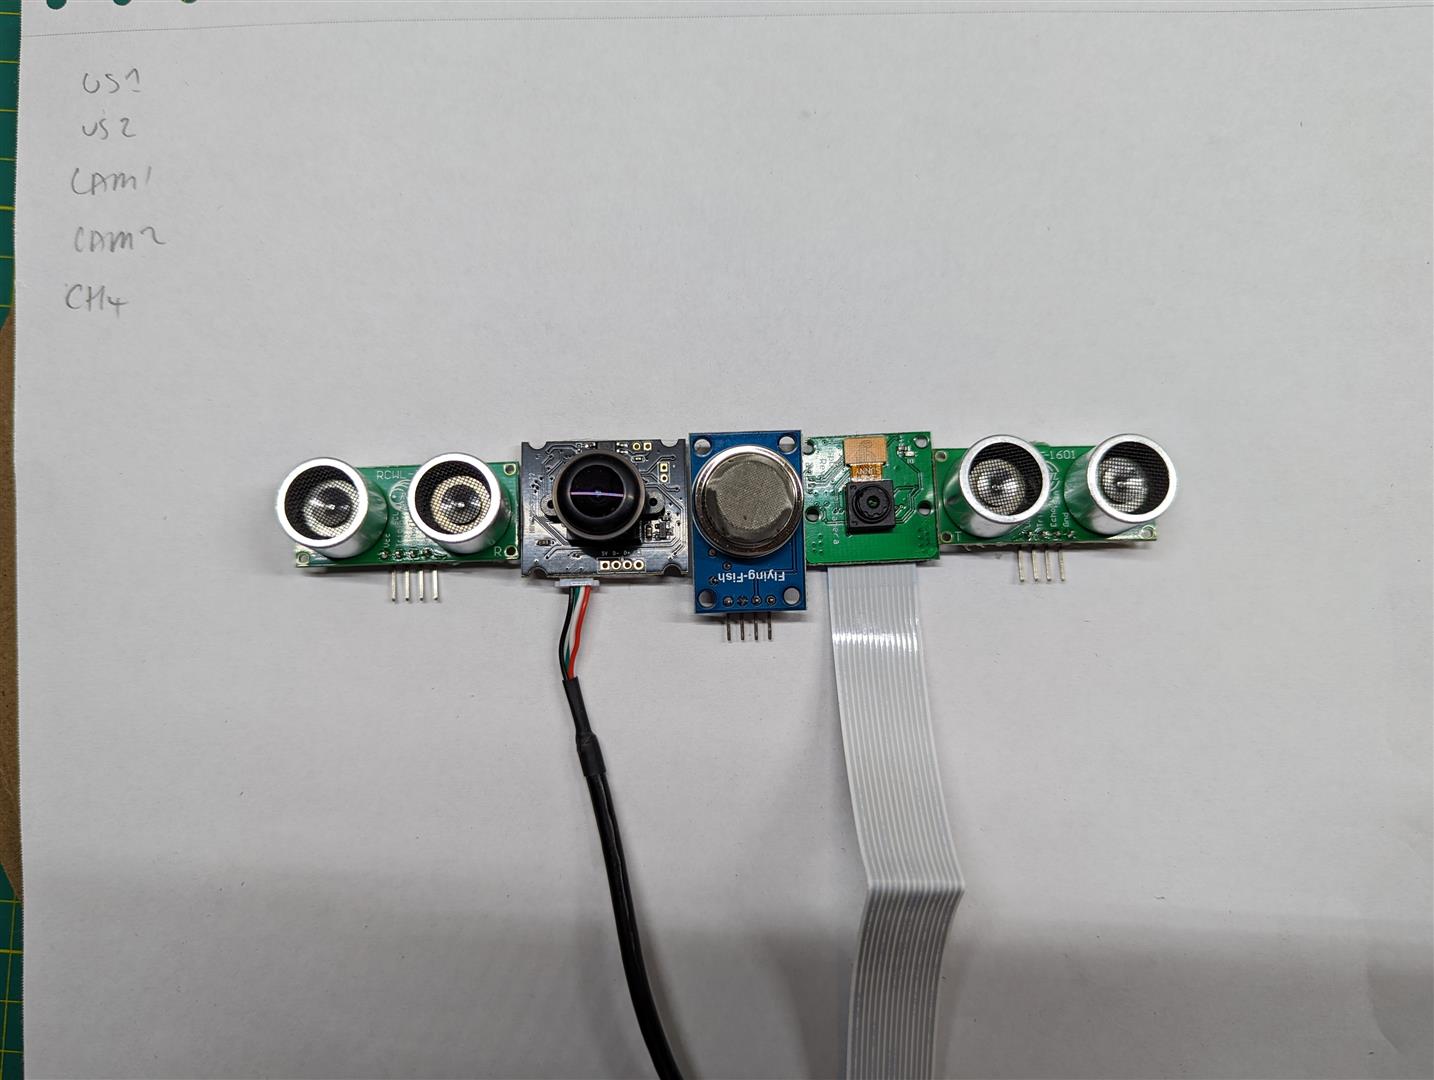
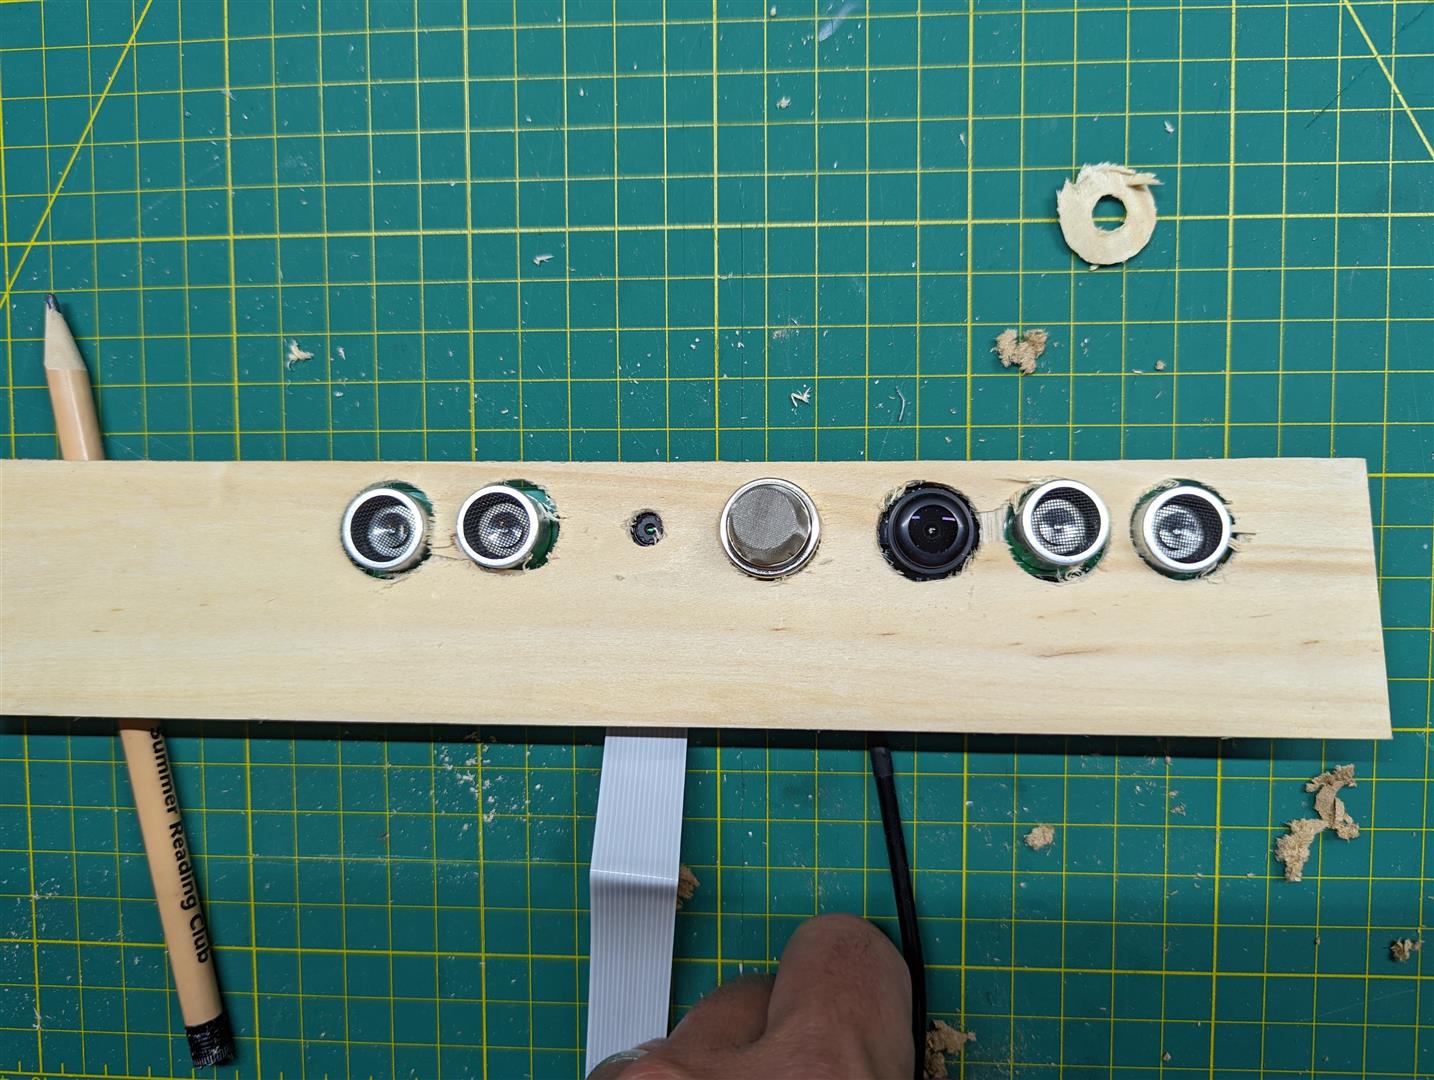
Front Sensor Array
This will sit at the between the head and the top of the body. Technically it will be part of the head, so that it can turn & rotate. However we may end up having this as part of the main body, or splitting into 2 different sections. Here are some WIP shots of the sensor array:

Videos
Here are some videos of Ron doing his thing. Randomly added here where they don’t otherwise fit with the rest of the article.
Tell me some Dad jokes
We use the https://icanhazdadjoke.com/ API to have Ron the Robot tell some random dad jokes.
Any idea or feedback? Want to see some of the code? Drop me a line in the comments, or on Twitter @legoszm or Instagram @markmakingthings